Over the next week or so, we communicated by e-mail. David sent me information about the Gizmo project along with many pictures.
Not convinced that I wanted to tackle the project, or if I even had the room to do it, since my wife and I had recently sold our property in Castle Rock and bought a house in Longview which only has a double car garage, I started reading online about NEV's (Neighborhood Electric Vehicle). The more I read the more I became interested in doing something with an electric vehicle.
Still not convinced that this would be something I would want to do, I kept dragging my feet and did not move forward on the purchase of the Gizmo from David.
The way my mind works is that if I find something I want, I typically put off buying what ever I am looking at for a while. My theory is that if God wants me to have it, it will be there when I am ready to buy it. If it is not there when I quit dragging my feet, then maybe God was trying to tell me I did not need it.
Then there are those times when I get going to fast and I buy something stupid without speaking to God about it first!
I also think that the longer I put it off, the more the seller will want to sell what ever it is and then I will get a even better buy.
On Sunday morning May 8th, I was in the rear of our home cleaning the shed when my wife called to me and asked if I would come to the garage to help her for a moment, as I rounded the side of the garage I noticed a truck backing a car trailer into our driveway and on the trailer was that Gizmo I had been speaking to David about. My wife had also been speaking to David about the project and told him to bring it by our home and that she would buy it from him for my birthday (May 9th). As far as I know, she did not even try to get it at a lower price, she probably even paid him more than the purchase price! Why would she do this? Because that's how she is. She is a sweetheart and I love her.
So, that was the beginning to my new project.
Here are a couple pictures of the Gizmo prior to leaving Minnesota and starting its new life in Washington State.


As you can see, this little rig came from a business called Galactic Pizza located in Minneapolis Minnesota. Evidently they have a few of this Gizmo's to deliver pizza in. The one I acquired from David is a 2004 model (production #26). By the way, these electric vehicles were made in Eugene Oregon and there were only 38 produced.
When we acquired the Gizmo, David had already removed the right and left fenders, the rear tail piece, the batteries and box, the rear tire assembly, the motor, and the swing arm assembly.
Please feel free to read more below or choose a topic from the list to the right at the top.


Below is the repair. I first welded a 1" x 1" x 1/8" tube in place where the strap was. Then I thought I should make sure the box would fit in the hole. Of course it would not. So I had to cut the tube down the center and re-welding it making it a 1" x 1/2" x 1/18" tube, which is much stronger than what was there previously. It also gave me a nice anchor point to bolt the control box to.


David had the battery box cleaned, repaired, and coated with Line-X.


Please feel free to read more below or choose a topic from the list to the right at the top.
Frame Work

As you can see (above), the frame has been through a lot in its life. I am not sure what caused this hole and there is also a crack in the frame running from the hole, up to the right and continues around the 1"x1" tube.
Below I show the repair. This material is difficult to weld on because it is old, rusty, and 1/16" of thick.


This above picture is of the underneath of the Gizmo
(the frame is standing on end).
This is one of the 1" x 2"x 1/16" tubes that the battery box sits on. The inside of the tube was highly corroded and split from left to right. I replaced both the supports with 1" x 2" x 1/8" tubes that are considerably heavier than the factory ones. Below, you can see the repair.

Below you can see where someone cut out part of the 1" x 1" x 1/16" tube to make room for a control box that was installed. They installed a 1" x 1/16" strap to try and recover some of the strength that was lost in modifying the frame.

Below is the repair. I first welded a 1" x 1" x 1/8" tube in place where the strap was. Then I thought I should make sure the box would fit in the hole. Of course it would not. So I had to cut the tube down the center and re-welding it making it a 1" x 1/2" x 1/18" tube, which is much stronger than what was there previously. It also gave me a nice anchor point to bolt the control box to.

Front Suspension

This above shot is a top view of where the right front suspension bolts up (left is the same). The bushings and bolts were worn to a point that there was roughly 3/16" play between the bolt and the bushing.


Here above is the repair (left side). Both left and right bushings and bolts were replaced.
Rear Hub Assembly
David had machine work done on the rear hub assembly. There were a few bearings that needed replaced. In the rear hub assembly, he installed (2) bearings side by side where there was originally only (1). This should give the wheel assembly some greater life.
Rear Hub Assembly

Doubled Up Bearings In Hub

You can see the split between the two bearings David installed. Normally there would only be one bearing on each side of the hub. The left side now has two.
Wheel Hub
I took the left and right hubs to work and soaked them in hot tank solution. Hosed them off and when I got home I noticed this crack in one of the hubs. I am really glad that I stripped these down to the bare aluminum as I would of never found this crack if I had not.
You can see the crack running around the hub (dark line).


If you happen to have a Gizmo or any other vehicle with aluminum hubs, it maybe wise to pull the wheels off and do a inspection of the hubs.
Battery Box
David had the battery box cleaned, repaired, and coated with Line-X.
Before

After

The box turned out quite nicely and should have greater life than the original.
Battery Shield
Below is a few pictures of what I guess I would call a "battery cover". This is just forward of the battery box and installed to attempt to keep some of the water and dirt out of the battery box area.


Below I show the "cut out" I had to make for the tool tray to fit. something I should of checked before I bolted it in.

Below shows the tray in place.

Shocks
I am shopping for some new shocks and may have found a set for the front but am still looking for a rear shock. The picture below is of a shock I found (for free). The shock is about 3" longer than the stock shock but thought I would give it a try since the price was right. I had to jack the Gizmo quite high in the air to get the swing arm to hang low enough to get the new shock to bolt up. It definitely holds the rear of the rig up in the air (about 1.5" higher than normal). The only bad thing is that the shock is bottomed out and so it has no travel. In a sense it is now a "Hard Tail".
So, I am still looking for a rear shock.

I have found a rear shock that I believe is off a older Honda motorcycle.
It is about a inch shorter than the original shock. I had to make a new lower mount to get it to fit correctly. I also used the original coil spring off the Gizmo shock on this one.

You can see below the mount I made for the bottom of the shock. I am hoping it is going to be stout enough to hold the rear suspension once I get the battery pack installed.

Shocks (front)
Below you can see one of the original shocks. It is very rusty and a lot of the coating on the spring and the catridge is gone.

Below you can see the new shocks I installed. These are NOS that I bought from Carl Watkins in Eugene Oregon.
These shocks are made by Progresive and have a spring rate of 105/150. The original rear shock was made by Progresive also and had a spring rate of 160/190.


Motor
This is a D & D motor. It measures 12" long and 7" wide. The original motor measures about 10.5" long and the same diameter. I think it is about a 10 horse power motor but I am not sure on that.
Feel free to correct me if I have the rating wrong.
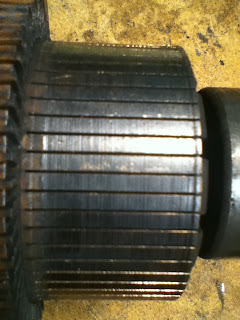
I have attached a couple of picture below of the comm-bars. I pulled the end of the motor off from the case and cleaned the slots between the bars.
Before Cleaning Below

After Cleaning Below
